August Made #2 - A Quilt for My Sofa

This summer we finally got a sofa after years without one. It's the Charles from Huppe that we got during the Bay Days Sale (huge discount!). I made a quilt to put on top of it to serve as a slipcover and blanket at the same time. 

Since this this a utility quilt that it must be "high-performance" and durable to withstand our daily wear and tear. Also since this is a quilt displaying on the living room it must not be too ugly. In the end I came up with this more modern looking piece measured 84.5"X66". It's a relatively quick made as the blocks are quite large (16"X16") and simple (mostly rectangles, some frying-geese). The most time-consuming part happened to be the borders - cutting and joining 2" strips together is tedious and boring. But I think the time spent is totally worth it as the borders really make the quilt more appealing. 

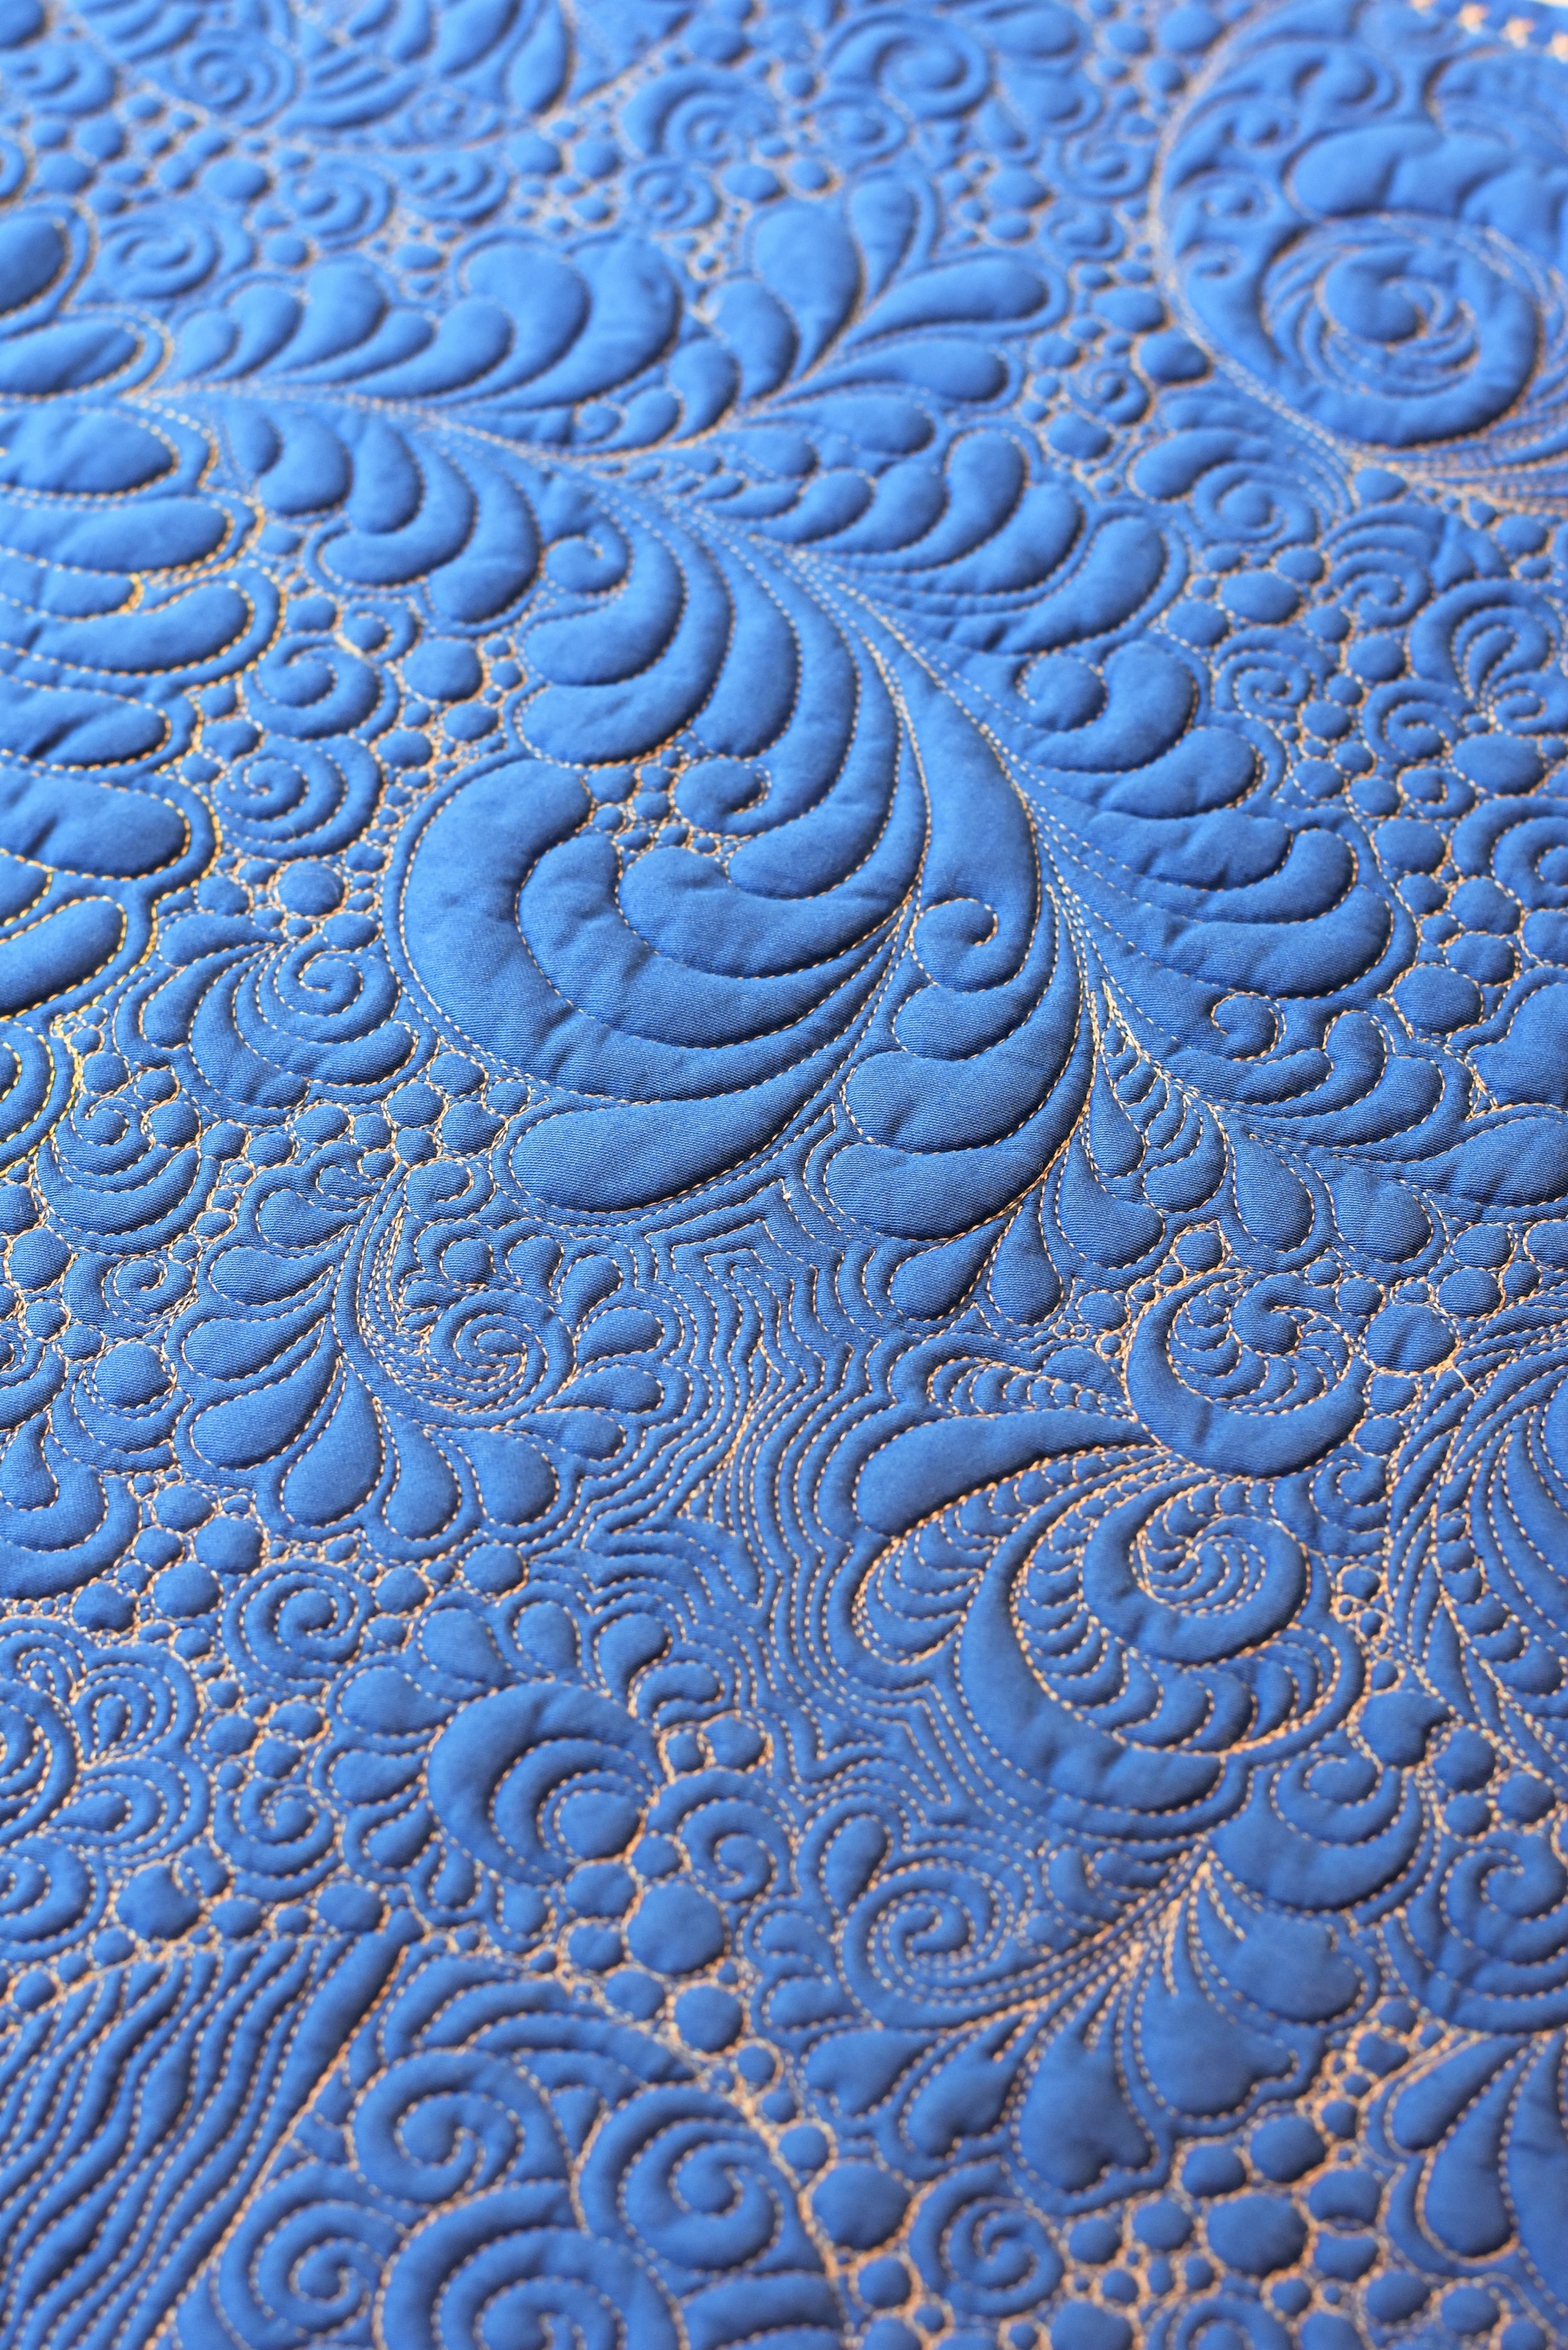
My trick of making the quilt "tough" is quilting all-over the less that 2 inches apart. Only simple and basic elements: loops, paisley, swirls and straight lines were used. To save time, I quilted with large scale motifs. My Q20, with it's large harp space, made it so much easier to create big motifs without frequent stops and repositioning. Sadly my Q20 still misbehaved sometimes that it annoyed me with several synchronization error messages while quilting this quilt. I am pretty sure that there is not synchronization issue as the stitches are beautiful and tension is perfect. Still need to make up my mind if I would dismantle the machine again and ask my dealer to replace the computer parts that control synchronization. 

I also practiced ruler work on this project. I love these extremely straight straight lines, which is impossible when free motion without a ruler. Love it!

40 weight polyester/viscose threads were used for FMQ. I used several types, including Isocord, Hemmingworth, and Sulky (simply for the purpose of using up odds and ends threads). 

Batting is Quilters Dream Cotton Select. I have been pairing with Quilters Dream Cotton Request (thinner batting) with wool or silk batting for my other projects but this is the first time that I use the Select line (slightly thicker), one layer only. I love the result. It is not as stiff as Warm and Natural, soft, drape beautifully and shrunk beautifully after wash and dry. It does not really have any loft, making it so much easier to quilt, especially when feeding through my sewing machine for stitching-in the-ditch with a walking foot along the sashing. Would definitely use this batting again for future projects!

If I make this quilt again I would opt for more neutral colors instead of bright tones. I tend to like a clean and neutral looking living area. Yes this is a good excuse to start another project!

August Made #1 - Mini Christmas Panel Quilts

I picked up these Gingiber Merrily panels (along with a bunch of fatquarters and yardages) at the Workroom during their sale. Their plain background is perfect for free motion quilting. Spent a few days and I got three gorgeous mini quilts to decorate my house. 

For these quilts I used only one layer of Hobbs Heirloom batting, without a thin layer of cotton batting (typically Quilter's Dream Angel Request) functioned like a backing, like what I have done in my other mini quilts. It's easier to quilt, but I think an extra layer of cotton batting does improve the dimensional texture and enhance the stitching details. I should not make shortcuts next time. 

I quilted with Superior Thread Bottom Line purchase a few years ago. I found it not as smooth as WonderFil DecoBob. Bottom Line is a matte thread, blending into the fabric quite well but lacking the sheen of DecoBob. I think it can be a good choice for modern, neutral quilts, but the quilting experience is not as enjoyable as matte threads generally have more friction when free motion quilting. I also found when a thread blends so well into the fabric, it can be very difficult to see the stitches while quilting!

Just filling in the background with various types of motifs is lots of fun! No markings and no really planning ahead, I simply enjoyed that zen of free motion. It's relaxing and calming. 

I love these panels and they are already on the wall... Christmas is coming... eventually! 

The Ultimate Travel Bag

Annie's Ultimate Travel Bag class is one of my favorites on Crafsty. To make my own, I purchased a finishing kit from her site (including the base stabilizer) and ordered Soft and Stable foam from Amazon. 

Face fabric is Northcott Fabrics the Passport line, coordinated with Daiwabo Vintage Dry Goods-Antique Dry Notions. Not a huge fan of the Passport line (I found the prints too busy for quilts) and I love the coordinating fabric so much that I orders 3 yrs from the Workroom when it's on sale. There is 1.5 yrs left for me to make another one! Lining fabric is from the Downton Abbey collection by Andover Fabrics. I found Andover's quilting cotton is slightly thicker and very high quality, love it!

I followed Annie's pattern and instructions meticulously from start to finish. The only thing I ended up not putting on is the strap from suitcase because I don't think I will use the bag that way and rather have a clean looking back panel. 

To make this bag, 4.5 yds of fabrics were used! Unbelievable! But it's so nice to consume my old stash... and make room for new fabrics!

I did the quilting on my Q20. It's a simple swirl design, quite large in scale to conform with Annie's 1 inch spacing quilting suggestion. 

I learned so much from this project: sewing buttons with machine, binding finishes, applying zippers, and so many little tricks and tips. It's so much fun! Though I much admit that the last step of binding to finish the interior is difficult, partly due to its large size. In the end, I found if I baste the binding strip to the side panel or the front/back panel with a scant 1/4" seam, sew the panels together with true 1/4" seam and then finish the binding, it's easier than sewing the panels together and then finish with binding.

The only unfortunate result is that my handles are two inches too short from the pattern suggestion (I trimmed too much selvages I guess). Lesson learned. I will double check my dimensions next time. 

Since there are still some Soft and Stable left, I pulled out a very old pattern (got it in 2008, the very original Weekender Bag by Amy Butler!) from my storage bin, and will do my second attempt of bag making. I will modify the instructions and sew it in Annie's way with Soft and Stable. Stay tuned!

The Arkansas Crossroads Quilt in Liberty Tana Lawn

I felt so good to have two quilts completed last month. Here is the Arkansas Crossroads Quilt in Liberty Tana Lawn (78" x 78"). I started this quilt last summer. It's a quick to make project but I was not able to work on it continuously, so it took a long time to finish. Luckily towards the end of this project I got my Q20, which definitely speed up the process. I practiced quilting straight stitches with a ruler on my machine. I thought it was easy, but it wasn't until the 3rd or 4th border that I finally got the hang of it and not steering off my markings. Hence, the borders are kind of terrible. Fortunately, once the quilt was washed and shrunk, the imperfections diminished a lot and looked much better. 

This is quite a memorable piece as the Liberty prints were purchased while I was on vacation in London (2014) and Tokyo (2016). Since Tana Lawn is more refined and thinner than regular quilting cotton, I chose white cotton sateen (from Fabricland) as background fabric and light blue Swiss cotton batiste for borders. The cotton batiste is delicate. I think I have to use this quilt with care...

I reserved this quilt for myself, and used luxuries Hobbs Tuscany Silk + Quilter's Dream Angel Request Cotton for batting (for warmth and softness). Now I have three quilts adorning my bed and keeping me warm: the Pheasant Feathers quilt, the Dresden Plates quilt, and this one. 

Quilting was done with Aurifil cotton (50 weight) for the body and Hemingworth embroidery polyester thread (40 weight) for the border. By the way, I first tried Hemingworth in June (my Bernina Q20 dealer carries it) and felt in love. It's so silky and smooth, producing beautiful stitches on my machine when pairing with a size 100 needle. 

The Learn It, Make It Sampler Quilt

I spent a long time to make this sample quilt (blogged here, here and here) and just couldn’t let the fact that poor quilting ruined it. So… I fixed the quilting myself.

Since I opted for wool batting (Hoobs Heirloom Wool) for this wall quilt, when I got it back from the longarmer, the quilt was lofty, did not lay flat and the blocks/applique designs did not really “pop” because the background not densely quilted. Once I realized the issue. I started ripping, and refilling/filling the background.

The quilt looked much better now! All I need is to make a sleeve and hang it somewhere. It is measured 61" x 74" and is consisted of 21 blocks:

1.    Lone Star – strip pieced, with redwork hand embroidery in the background
2.   Needle-turned as You Go Applique block from Elly Sienkiewicz’ book Precuts and Plenty, Pattern #15, page 102
3.   Dresden Plate – hand appliqued to the background
4.   Rolling Star #1 (my own drafting as shown here)
5.   Rolling Star #2 (variation)
6.   Rolling Star #3 (different color)
7.   Flying Geese
8.   Mariner’s Compass – my own drafting; paper pieced
9.   Sunburst – my own drafting; hand pieced
10.   Log Cabin
11.   Feather Star – my own drafting
12.   Baltimore applique – based on Elly Sienkiewicz’ book Baltimore Beauties and Beyond Vol. 2 Pattern #4, page115; with my own twist on the corner flowers design. Done in Appliquick + glue method and hand stitched to the background fabric.
13.   Baltimore applique – based on Elly Sienkiewicz’ book Baltimore Beauties and Beyond Vol. 1 Pattern #21, page144. Done in water soluble freezer paper + glue method and machine stitched to the background fabric.
14.   School House
15.   Cross – English Paper Piecing
16.   Keep Calm and Sew On – Machine Applique (turned edge for the pin cushion, raw edge for the letters); my own design
17.   Swans – machine applique turned edge; my own design
18.   Yankee Pride/Saw Tooth Star Variation – my own drafting
19.   Swoon – my own drafting to an 8” block
20.   Star Variation – my own drafting
21.   Hexagons – hand stitched panel to fill in the space left…

There are tons of techniques involved in making this sample quilt. So it truly a learning quilt for me! It’s truly a memorable piece of work!

Bernina Q20 and the B770 Update

The year of 2017 has pass by more than half. This year has not been smooth for me. Followed by the D&C last year, I was diagnosed with Asherman’s Syndrome (while having vacation in China!), which led me into two hysteroscopy surgeries/examinations and three months of hormones treatment. 

Quilting time has been scanty but it’s definitely a therapy for me. So far I’ve managed to finish two big quilts (the sampler quilt and that Liberty cotton lawn quilt) that I started making in 2015/2016. Stay tuned for pictures!

Just to keep myself happy, in April I upgraded my Bernina 710 to 770qe + embroidery module, and I ordered a sit down longarm, the Bernina Q20! I signed up the free classes offered by my dealer. It’s been so much fun to explore the possibilities of machine embroidery, which I had never tried before.

I set up new sewing corner for my creative adventures, and hope to produce more and more quilts and crafts here.

The Q20 arrived in May. My machine was stubborn at the beginning that a synchronization error message kept popping up, followed by a restart of the machine. After several trips to the dealer’s place, and several rounds of checkups. I finally brought it home permanently in July! It runs quite smoothly so far, with only two error messages appeared so far maybe because I left the needle down when I turned the machine off or the needle threader was not at its proper position. I could definitely say that the Q20 is very sensitive… (which may be a bad thing) but when it is running properly I am so in love with my Q20 indeed. The stitch regulators, the LED lights, and big throat space, the hefty and solid table… ah! It’s heaven! It’s also so much easier maneuvering a large quilt on the Q20. No more fighting with the throat space!  I also ventured into the new world of rulerwork but still in the learning/practising stage and trying hard not to get the straight lines shifted or off track.

A feature that I am not satisfied with the Q20 is the lower thread indicator. It’s not helpful at all as you have to enter at the beginning the total length of thread in your bobbin, which is never accurate. Therefore the machine cannot really tell the exact length of thread left in the bobbin.

One thing that I wish to be installed on the Q20 is the thread cutter. A foot lower/upper control function like my B770 would also be lovely. With such an expensive price tag, the Q20 is lacking some of the bells and whistles that a high end machine should have.

While fighting with my Q20, I worked on a FMQ sample. It’s by far the biggest practise sample I’ve ever made. It’s big enough (19.5"x38") to use as a table runner, though the color of the fabric does not really match the style of my dining room.

Face fabric and backing is cotton sateen from Fabricland. Batting contains a layer of Hobbs Heirloom Wool and a layer of Quilters Dream Angel Request Cotton. The center feather motif was stitched with Superior Threads king Tut/Gutermann Embroidery Thread (both 40 weight), and the rest was stitched with WonderFil DecoBob (60 weight). Stitch definition and drape are both great. I seldom use the fancy stitches on my sewing machine. This time for fun I tried an "x" stitch for binding. It's not bad, eh?